RSS

Category Archives: Cooking

Kitchen Preserves

A lot of people say we have had a lousy summer but for me it hasn’t been so bad. I’m not a one for the hot sun so having a summer without having to try to get to sleep sweating away in bed with pesky mosquitoes buzzing around your head all night, has been lovely. Great Britain is blessed to have such wonderful seasons and being placed where we are facing the Atlantic we have to accept whatever weather comes our way. September is one of my favourite months and it has already lived up to its reputation of providing us with some lovely Indian summer days.

I love the Autumn. I love how September slowly starts to bring in these chilly mornings followed by a glorious warm sunny day to then end as a chilly evening that might need the first fire to be lit. I love the first of the Autumn gales blown in from the Atlantic giving us a timely reminder of what’s to come. I love to see the hedgerows bursting with fruit; blackberries, sloes, haws, rose hips, elderberries, crab apples and rowan. I love to go to farmers markets and greengrocers and see the new Autumn harvests for sale; damsons, plums, greengage, pickling onions, cob nuts, pears and apples. And you really can’t beat walking across a field and stumbling upon some Field Mushrooms or, if you are really lucky, a Puffball or two! Best of all, l love turning my hand to preserving some of these fruits and seeing the jars and bottles in some dark corner of the kitchen lined up, maturing, waiting to be opened on a cold winters day and releasing their summer goodness onto your plate. Right now is as good a time as ever to get out there and start gathering some blackberries and turning them into a few pots of jam and a nice crumble or pie, especially with some nice Bramley apples thrown in.

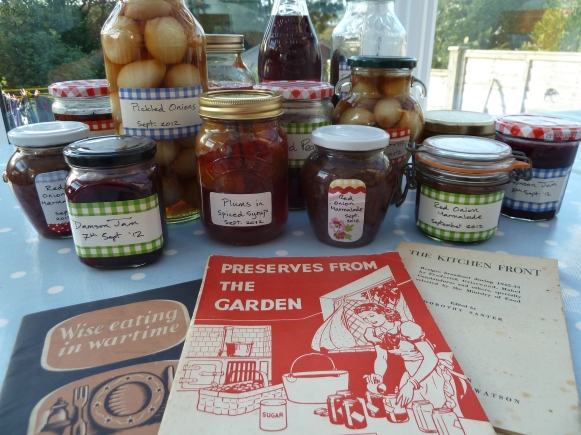
Some of my preserves and booklets from WW2

In the kitchen its the time to get the preserving pan out again and I have been busy over the past couple of weeks making not only Damson Jam which, by the way, is the best jam l have ever made, but also a few jars of Red Onion Marmalade, Pickled Onions, Sloe Gin, Pickled Pears, Blackberry & Apple Jam and even bottled some Plums. I haven’t tried bottling fruit for years and unfortunately l made the mistake of having the oven too high and literally boiled one of the jars to the point it was bubbling over the brim. Oops…it still formed a vacum when it cooled so should last a little while. I recently bought the River Cottage book on Preserves and can really recommend it.
Of course, back in WW2, preserving foods was not done as a bit of fun but was essential in providing fruit during the long winter months. As well as making jams and chutneys people would have dried, bottled and stored as much as they could. Blackberries were the most common fruit as they will grow anywhere including waste land in inner city areas. In the countryside the pickings were far better as l have already described. The W.I. formed preservation centres in villages up and down the land making tons of preserves for the general public using free fruit that would otherwise have gone to waste. Last weeks episode of Wartime Farm showed how canning was the most popular method of preserving fruit as this needed less sugar than making jam. I really take my hat off to those women of the W.I. who did so much for the war effort and brought comfort to so many.

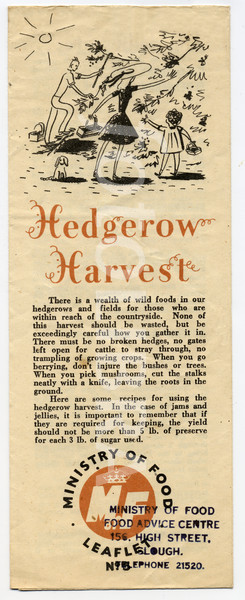
This wartime leaflet still carries sound advice for anyone today wishing to collect some of this Autumns free harvest. Go on, give it a go. Believe me there is nothing better than going for a walk right now and coming back with a few berries from the hedgerow and turning them into a pot or two of jam.
 
5 Comments

Posted by on September 23, 2012 in Cooking, September


Tags: , , , , , , ,

My Sourdough- Creater of Life

Sourdough, what does that conjure up in your mind l wonder? Unless you have eaten sourdough bread l should imagine it would be something like me; a heavy,yeasty, horribly sour tasting loaf that is best left to the extreme foodies of this world who have far more ‘cultured’ taste buds than me.

Well, when we returned to the UK recently l called in to Leakers Bakery in Bridport and bought one of their sourdough loaves. We had it toasted the next morning and it was delicious. In fact, it lasted nearly all week. My next step was to buy the River Cottage Handbook No.3 on Bread by Daniel Stevens.For the recipe just click here. If you are into making bread, thought of doing so or even just slightly considered it then you MUST buy this book. It will gently hold your hand throughout the whole process of choosing flours, which yeasts to use and the beautiful process of making your first or even your 50th loaf of bread. I am sure this is the process they must have used back in the war years when yeast was unavailable.

Having made a few loaves already from the book ie. White Loaf, Wholemeal Loaf and Malted Grain, which is excellent by the way, l decided to go for it and produce my own sourdough ‘starter’.

This magical process is a way of making your very own yeast from the natural yeast spores that are all around us by mixing flour with water and leaving it in a warm room for a day or so and wait for the first tell tale signs of tiny air bubbles to appear on the surface. At this stage you know you have just created a life form!

My Baby- 3 days old

Happy Birthday- 1 week old!

Ohh, scary…a new responsibility has just arrived and one that can, quite literally, stay with you for the rest of your life! Some starters have been around for 30 plus years! Anyway, having just created your new life you must throw half of it away and replace with more flour and water. This is called feeding the starter and has to be done everyday for the first 6 or 7 days. By the end of the week you should have a lively starter that is positively frothing.

Kneading my Baby

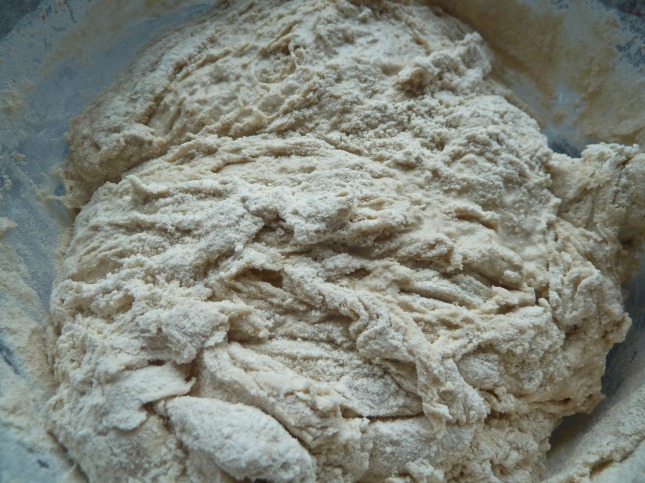
You are now ready to make your first loaf of sourdough. The recipe calls for making a ‘sponge’ with flour, water and a ladleful of the sourdough starter. Give it a good mix and leave in a warm place overnight. The next morning add the remaining flour and salt and stir up well. Then get your hands in and scoop the lot out onto a floured surface. Knead well adding a little more flour from time to time until smooth and silky.Place in a clean bowl and cover, leaving to double in size, about an hour. Then turn out and press with your fingertips to get the air out. Shape into a round and place back in the bowl and let it double in size again. Repeat twice again.

After the first proving


Place dough on a floured surface and again, using your fingertips, press it flat. Cut into sections and shape into loaves or place into tins. Cover, and leave to rise until double in size. This could take up to 3 hours. Get your oven up to a high heat, something like 240 or 250c.

The Final Proving

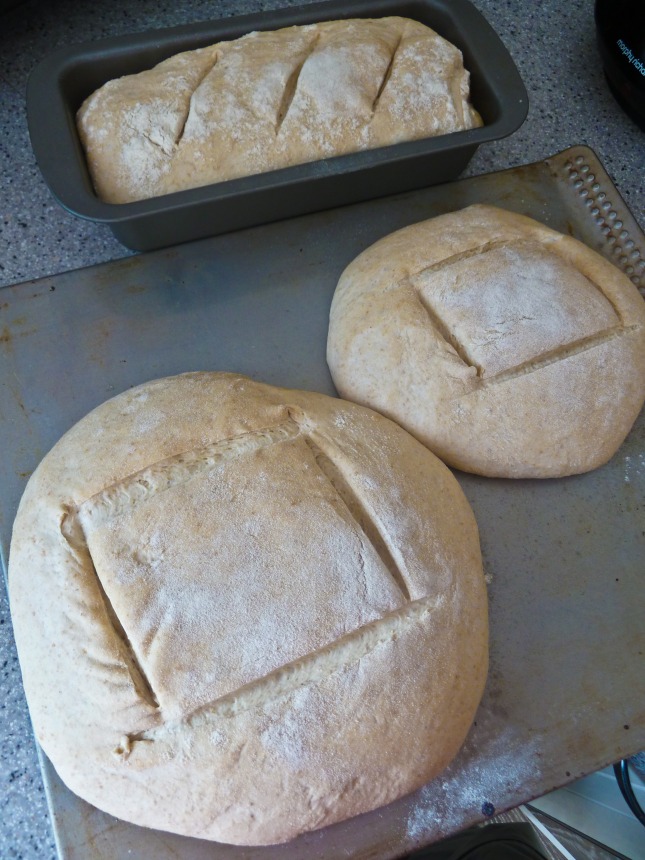
I place a pan of boiling water at the bottom of the oven to imitate the proper professional steam bread ovens that give the bread a good crust. Slash the tops of the loaves and bake for 10 mins . Check on the crust,if it is browning quickly turn down to 180c. Bake for a further 20 or 30 mins. Let it cool on a rack before slicing.

Look what my Baby has done!

A tin loaf

Well, l couldn’t resist a quick slice. Verdict: It is quite amazing really. To think this has been made with just yeasts from the wild is incredible. It has a nice slight tangy after taste, moist, and l can’t wait to toast some with a dollop of home-made blackberry and apple jam. Let me know if you try this too. Note: This is a labour of love really. It takes up a big chunk of your day but if you have things you can do in-between proving then its not so bad. I managed to sort out all my old CD’s ready for packing!

 
10 Comments

Posted by on August 14, 2011 in August, Cooking


Tags: , , ,

Bread Making

Another holiday out here today and l forgot. What is it this time? Actually, this is Pentecost Monday, and the brief recent history of this day is quite interesting. Click on the link to know more. So where does the bread-making thread come into it? Well, the shops are shut and we don’t have any bread so l made some. Actually, a few shops are open in the village in the morning but were closed by the time we realised we were out of bread.

When bread became rationed in WW2, many people turned their hand to making bread. Fresh yeast was difficult to come across but dried yeast was available. The recipe given by Marguerite Patten in her book Feeding the Nation: Nostalgic Recipes and Facts from 1940-1954, is exactly the same as used today and gives some interesting variations eg. Cheese Bread although that would have used up your cheese ration, Fruit Bread, Herb Bread and Malt Bread using malt extract or Ovaltine!

I make bread, from time to time, but can’t say it is something l do religiously but when l do l really enjoy it. There is something almost primeval when going through the whole process of making a loaf; from seeing the yeast develop, kneading the bread and watching the loaf rise, it is quite therapeutic and deeply satisfying. I feel like shouting out the window ‘Come on World, do your worst, l’ll be okay because l’ve just made a loaf of bread’!

So, for the recipe. I love using ‘proper’ flour and by that l mean a good old-fashioned flour like Doves Farm Organic Strong White Bread Flour. I bought a load when we were in the UK last time. I normally make a wholemeal loaf or Spelt bread but this time l just needed a quick loaf.

Click on this link for the recipe on Doves Farm website and for loads of information in general about bread.

Kneading the dough

Proving the dough

Mmmm...it smells lovely!

Some people use bread makers and l am sure it makes a great loaf but l like a natural look to my bread so l just place it on an oiled baking sheet direct into a hot oven for 35-40 mins. or so.

Like any cooking at home you know what has gone into making the loaf that you bake. You also get the added bonus of your home filled with the beautiful aroma of freshly baked bread. All we need now are some people to come and view the house!

 
4 Comments

Posted by on June 13, 2011 in Cooking


Tags: , , , , ,

Chicken Tagine

Now l know this has nothing really to do with Mr Middleton’s gardening advice but this is for anyone interested in cooking chicken, tagine style influenced by Tanya over on chickandaluzia. We drove down to Morocco about 4 years ago in our camper van and spent 10 weeks away. We met up with some amazing people, drove through the Atlas Mountains and into the Sahara desert. It was hell of an experience and one l recommend to anyone with a van.The people were great, if not a bit demanding at times, and the scenery was stunning while driving through the mountains.

It was while we were on these travels that we came across a village where a guy made tagines; tagines of all shapes and sizes along with the base for burning charcoal. The charcoal was available from the guy next door who made his own on the premises. I recorded it all on my Camcorder and when we look back at it now we can hardly believe we did it.

The recipe is made up from a mixture of what we experienced from restaurants and friends along the way so no exact measurements and please feel free to experiment.

Recipe: Chicken Tagine.

  • 1 chicken.We always buy Free Range Chicken. Cut into breasts, legs and wings.
  • Lge onion, chopped
  • 2 or 3 cloves of garlic, chopped.
  • Red pepper, chopped.
  • A few new potatoes.
  • A few tinned artichoke hearts.
  • Carrot, sliced.
  • Half an Aubergine, chopped.
  • Tomatoes, chopped.
  • Some preserved lemon slices.
  • Olives.
  • Spices. We bought a large bag of special tagine spice while we were there but this has long gone so this is about as close as l can get. Mix of ground coriander, cumin, ginger, cinnamon, paprika, garam masala, cardamom and turmeric.
  • Salt & Pepper to taste.

The Burn

So, get your tagine. Sorry, l can’t remember the name of the village in Morocco! I can’t believe ours has survived all these years as we used to take it with us everywhere we went.

Get a good bed of charcoal going, put a good dollop of olive oil in the base and fry the onions and garlic for a few minutes.

Fry the chicken pieces for a while and add the spices frying a few more minutes.

Add all the other ingredients along with a goog glug of veg or chicken stock. Place the lid on with a spoon under it to allow the steam to escape.

Cook slowly

Cook for 30-40 mins or so. Add some chopped coriander and parsley.

Traditionally served with cous cous but rice is nice or just as it is. I’m not a fan of mint tea either so a nice cold beer or glass of red wine goes well.

There is something really nice about cooking outdoors like this. Its not the same as a barbecue. This takes longer, the preparation is all done outside, as is the cooking and the eating. Don’t rush this. It takes time but is well worth it. Do you have a recipe you want to share?

PS. This version was delicious!

Ready to serve

 
8 Comments

Posted by on May 23, 2011 in Cooking


Tags: ,

Elderflower Cordial

Coming back from work yesterday l noticed the hedgerows were starting to fill with Elder flowers so l had to stop and pick some and make my all time favourite non-alcoholic drink, Elderflower Cordial.

Did you know?:

        • that animals find the smell of elder leaves so awful that even rabbits won’t eat them.
        • in years gone by people use to gather elder leaves on the last day of April and place them on their doors and windows to keep the witches away;
        • gardeners used to place the bruised leaves around tender plants to deter aphids and put a sprig in their hat to keep away midges;
        • cutting the tree for firewood will bring bad luck;
        • elderberry cordial helps relieve a sore throat;
        • elder flowers can be dipped in batter and eaten as fritters;

I use a recipe from Sarah Raven and l think it’s the best one around. This is easy, really easy and probably takes about 20 mins from start to finish, with 24 hours in between.

So first, go and pick your flowers…

Elder flower

Try not to pick flowers close to a busy road and take a sniff of the flower. Ideally they will smell of bananas but probably will have a faint whiff of cat. Don’t worry as the real fragrance comes out during the process of making the cordial. Try not to pick flowers that have started to turn brown as this will taint the drink. I trim as much of the stem off as possible before plunging them into the syrup.

Elder flowers in the syrup solution

Chop up your fruit and add to the elder flowers. Give it a good stir and leave for 24 hours.

Mixed fruits

Next, strain and pour into warmed bottles. I use old Lemonade bottles with the rubber stopper.

Straining the syrup

It’s delicious with chilled fizzy mineral water and loads of ice and lemon on a hot summer’s afternoon.

The finished product

Go on, give it a go!


6 Comments

Posted by on May 11, 2011 in Cooking, May


Tags: ,

Easter Sowing, Planting and Cooking!

APRIL- 3rd WEEK

This is a very active period in the garden. Many sowings are made outside of the hardier things, while the less hardy are raised inside and hardened off for planting when frost is past.

1. Pot Sweet Corn.- Do not let sweet corn, sown in small pots, get root bound, but transfer to 5-in. pots.A greatly increased interest has been shown in this delicacy since our American allies came over. Unfortunately its successful culture is limited to the south and midlands, though it has been grown quite well in protected gardens further north.

2. Prepare Tomatoes for Outdoors.- Tomatoes being raised for outdoor growing should be pricked out and potted on if ready. Try to time them so as to be a foot high and ready for planting out at the end of May or early in June. Adequate stakes or ties must be provided for each plant. As they go, remove all side shoots, which arise in the axils of the leaves. Use a rabbit’s tail to fertilize the flowers, particularly early in the year.

Sow vegetable marrows now in the greenhouse. Push the seeds singly into small pots. They must not be planted out of doors till May, when the danger of sharp frost is over.

3. Make up Celery Trenches.-  Celery trenches should be made up now to allow time for settling down before planting. A thick layer of manure should be placed in the bottom and soil placed over it.The trench should be 10-in. deep, and the surplus soil rounded off at the sides to provide a growing place for lettuce, or beans etc. and for blanching the celery later. The trenches should be 12-15-in. wide for a single row, but at least 18-in. for a double row.

Most of the winter greens should be sown now, such as pre-Christmas broccoli, kales, etc.

4. Spray Apples and Pears.- Apples and |Pears should be given their second anti-scab spray.

5. Planting Work.- Plant out broad beans if they have been delayed. Plant out cauliflowers for succession, and make successional sowings of turnips and beet. Continue potato planting. Turn over the land as greens are used. Hoe between outside crops.

So, l hope you all have your Rabbit’s tail to hand and will be busy fertilizing those tomato flowers with it! I will be planting the last of my potatoes today it being traditional to plant potatoes on Good Friday. Why? I have no idea. Just tradition l guess. Instead of the celery trench l will be digging two trenches for my runner beans and put in the stakes at the same time. We get some vicious winds here, being close to the coast, so they need to be pretty rigid.

Yesterday, Mrs Hunt and l spent a few hours in the kitchen and did some baking. I had a go at making Hot Cross Buns.

Salter scales and pastry cutters

I used my old Salter scales that l bought for a couple of euros on a car boot sale from a fellow ex-pat. She threw in the pastry cutters as well which has a complete set inside the tin. Not sure of the date but could be 40’s or 50’s?

I got the recipe for Hot Cross Buns from the ever reliable Delia Smith.

Hot Cross Bun mix

Sure its easier to nip into Tescos and buy 6 for a £1.00 or whatever but apparently nothing quite beats the taste of a home baked bun. Its just the same for home grown veg then.

The end result

Ah, divine! Even if l say so myself! Have a great Easter and Happy Gardening!

 
2 Comments

Posted by on April 22, 2011 in April, Cooking


Tags: , , , , , , , , , , , ,

Things to do with nettles

I love this link from The Daily Telegraph web site. I made Nettle Soup a few years ago and it was delicious. Back in the War Years people foraged far more than they do today but with people like Hugh Fearnley-Whittingstall it is becoming a fashionable thing to do again. Roll on September and Blackberry time!

Top Ten Uses for Nettles

 
4 Comments

Posted by on April 29, 2010 in April, Cooking, The garden


Tags:

Rhubarb Upside-down Cake

Rhubarb Upside-down Cake

As promised, a picture of the Rhubarb Upside-down Cake made by my wife, Janice, the No1 pudding maker! It tasted as good as it looks! The recipe is courtesy of Sarah Raven’s ‘Garden Cook’ book which has become an all time favourite with us. The book is set out into months of the year and gives the most delicious recipes according what can be harvested from your plot in those months. Highly recommend it! Off to lunch round some friends today so l doubt very much if l will be fit to do too much in the garden by the time we return!

The Book

 
5 Comments

Posted by on April 18, 2010 in April, Cooking


Tags: , ,